# John Petrucci wiring: DiMarzio's 4PDT selector with split inside coils
Canonical page: https://guitarwiring.app/blog/dimarzio-john-petrucci-wiring
By Tinkercaster · 2026-11-04
DiMarzio's [John Petrucci Signature Model sheet](https://www.dimarzio.com/media/1589) doesn't use a 3-way blade. It uses a "4PDT pickup selector switch, 3 position (on/on/on)", part EP1111, wired so that "Up = Neck Pickup; Center = Neck/Bridge Split Inside Coils; and Down = Bridge Pickup". A standard 3-way blade only switches the two hot leads. For the centre split, the switch also has to send the series link of each humbucker to ground, and that takes the extra poles.
This article follows the sheet as it appears in our library, lug by lug. Then it compares the sheet with DiMarzio's ordinary two-humbucker, 3-way blade wiring.
## The parts
The [PDF sheet](https://d2emr0qhzqfj88.cloudfront.net/s3fs-public/2024-09/DiMarzio%20Wiring%20-%20John%20Petrucci%20Signature%20Model.pdf) names every part: a Rainmaker DP281 at the neck, a Dreamcatcher DP282 at the bridge, a 500K custom taper volume and a 500K custom taper tone (both EP1201), a .022µF capacitor (EP1022), a 2-conductor Switchcraft output jack (EP1301) and the EP1111 selector.
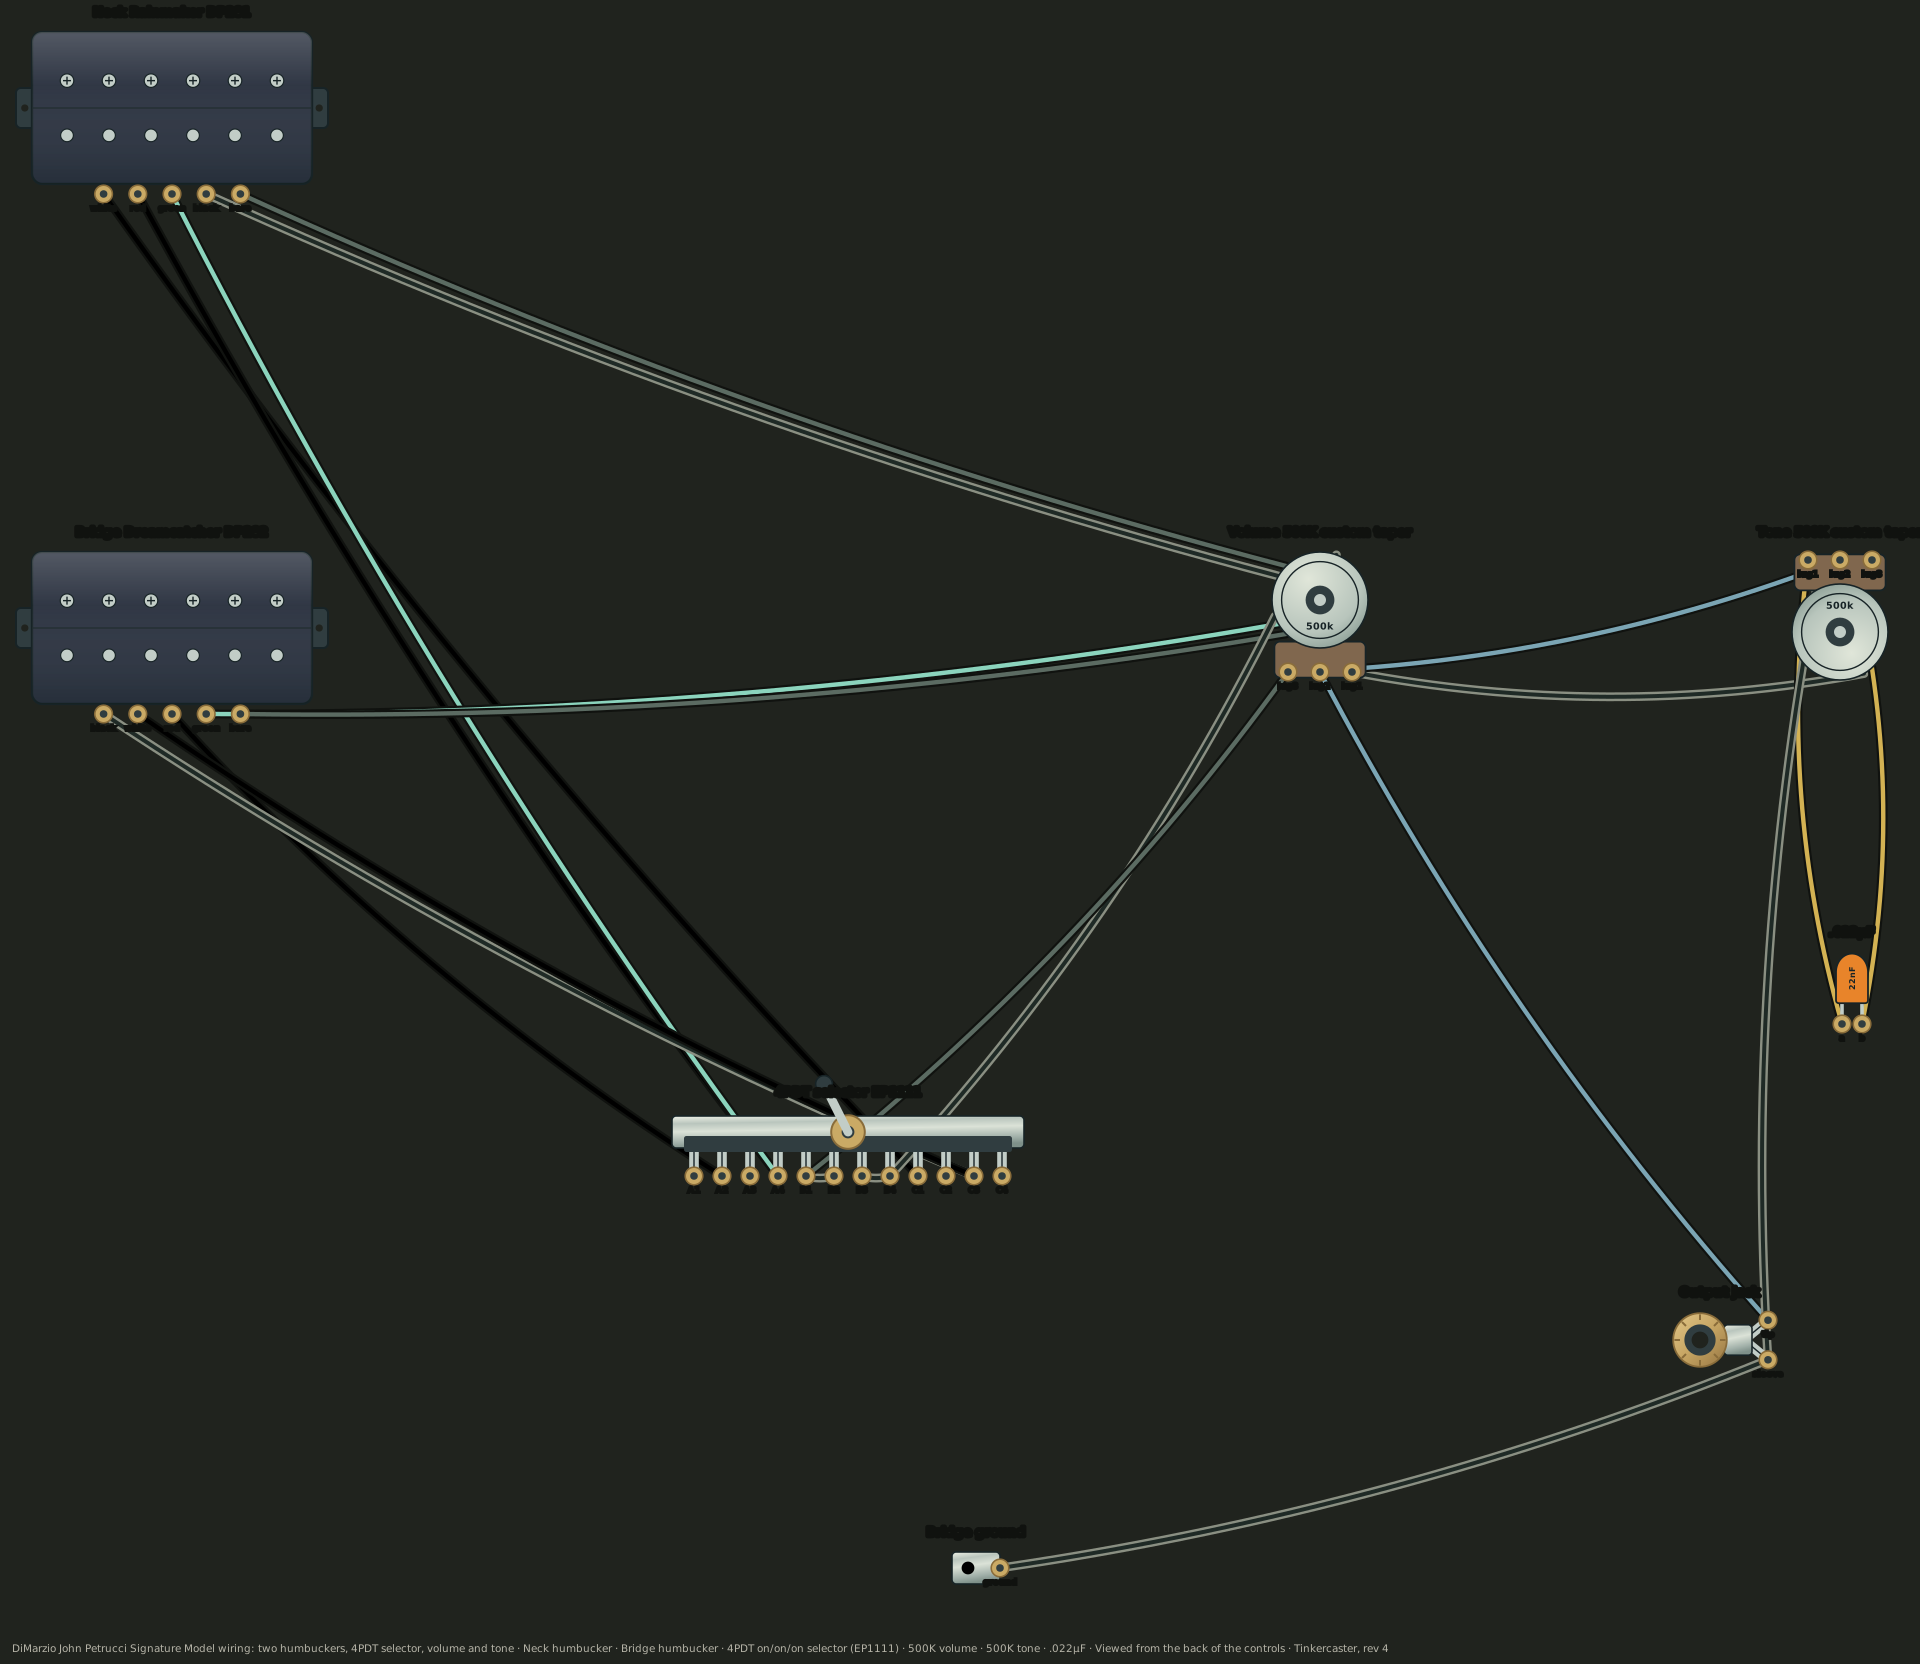
John Petrucci Signature Model, 4PDT selector, volume and tone, drawn by Tinkercaster from DiMarzio's John Petrucci Signature Model sheet (PDF). Open the full diagram for every connection.
| Part | Compatible example |
| --- | --- |
| Neck humbucker | [Rainmaker DP281](/catalog/dimarzio-dp281-rainmaker-neck) |
| Bridge humbucker | [Dreamcatcher DP282](/catalog/dimarzio-dp282-dreamcatcher-bridge) |
| 3-position selector | [EP1111 4PDT Pickup Selector (on-on-on)](/catalog/dimarzio-ep1111-4pdt-on-on-on) |
| Volume, 500K custom taper | [CTS 500k Audio Pot](/catalog/cts-500k-audio-pot) |
| Tone, 500K custom taper | [CTS 500k Audio Pot](/catalog/cts-500k-audio-pot) |
| Tone capacitor, .022µF | [Orange Drop .022µF](/catalog/orange-drop-022uf) |
| Output jack | [Switchcraft #11](/catalog/switchcraft-11-jack) |
| Bridge ground | Bridge ground wire |
The CTS pot is our simulator's stand-in. DiMarzio's sheet asks for its own custom taper.
## Naming the lugs
The EP1111 has four poles, each with a top lug, a middle common and a bottom lug, so twelve lugs in three rows of four. Neither DiMarzio's sheet nor its EP1111 contact chart names the lugs. Our diagram calls the rows A (top), B (middle, the commons) and C (bottom) and numbers the columns 1 to 4. Those codes are ours, assigned by where each lug sits on the sheet.
In [our catalog's model of the EP1111](/catalog/dimarzio-ep1111-4pdt-on-on-on), taken from [DiMarzio's EP1111 contact chart](https://d2emr0qhzqfj88.cloudfront.net/s3fs-public/diagrams/ep1111.pdf):
| Selector | Poles 1 and 3 | Poles 2 and 4 |
| --- | --- | --- |
| Up | B joins C | B joins C |
| Center | B joins C | B joins A |
| Down | B joins A | B joins A |
The centre position is the trick. Two poles stay on their bottom lugs and two move to their top lugs, so the switch can make connections in the centre that neither end position makes.
## Lug by lug
| From | To | Lead |
| --- | --- | --- |
| Neck white | Selector C1 | white |
| Neck red and neck green | Selector A4 (together) | red, green |
| Neck black | Volume casing | black |
| Neck bare | Volume casing | bare |
| Bridge red | Selector A2 | red |
| Bridge black and bridge white | Selector C3 (together) | black, white |
| Bridge green | Volume casing | green |
| Bridge bare | Volume casing | bare |
| Selector B1 | Selector B2 | jumper |
| Selector B3 | Selector B4 | jumper |
| Selector B4 | Volume casing | ground |
| Selector B1 | Volume bottom lug (input) | gray |
| Volume middle lug | Jack tip | gray |
| Volume top lug | Volume casing, then tone casing | ground |
| Volume bottom lug | Tone middle lug | signal |
| Tone bottom lug | .022µF capacitor | signal |
| .022µF capacitor | Tone casing | ground |
| Tone casing | Jack sleeve | ground |
| Bridge ground | Jack sleeve | ground |
The jumpers make two pairs of commons. B1 and B2 carry the hot signal to the volume, and B3 and B4 are ground. Every pickup lead that reaches the switch is therefore either connected to hot, connected to ground or left open, depending on the selector.
The two pickups are not wired alike. The bridge uses DiMarzio's usual [4-conductor colour code](https://www.dimarzio.com/media/1450): red to the switch as the hot lead, green and bare to ground, black and white together. The neck is wired the other way round: white goes to the switch, black and bare go to ground, and red and green are joined on one lug. The diagram notes state this explicitly. Wire each pickup exactly as drawn rather than "correcting" the neck to match the bridge.
## What each position does
Following the drawing through the contact chart above:
- **Up, neck.** C1 meets the hot commons, so neck white is hot. Neck black is on ground, and the neck red and green on A4 are joined to each other and to nothing else: that is the series link, so the whole neck humbucker plays. Bridge red on A2 is open, so the bridge is out of the circuit.
- **Down, bridge.** A2 meets the hot commons, so bridge red is hot. The bridge black and white on C3 are open and joined only to each other, which is the series link, so the whole bridge humbucker plays. Neck white on C1 is open, so the neck is out.
- **Center, neck and bridge split.** Poles 1 and 3 stay down and poles 2 and 4 move up. Neck white (C1) and bridge red (A2) are both hot. The neck's red and green junction (A4) and the bridge's black and white junction (C3) both go to ground. In each pickup, the series link is grounded, so only one coil sits between hot and ground. The other coil has both ends on ground and carries no signal. The two remaining coils are in parallel.
The library diagram gives the same results:
| Selector | Result in the diagram |
| --- | --- |
| Up: neck | Neck Rainmaker DP281 (both coils) |
| Center: neck + bridge split, inside coils | Neck Rainmaker DP281 (split to one coil) and Bridge Dreamcatcher DP282 (split to one coil) in parallel |
| Down: bridge | Bridge Dreamcatcher DP282 (both coils) |
"Inside coils" is DiMarzio's wording on the sheet. The drawing does not show which lead pair belongs to which coil, so follow the sheet's wiring rather than trying to pick coils yourself. For why a split coil works this way, see [Coil split wiring diagram](/blog/coil-split-wiring-diagram).
## Compared with a 3-way blade
DiMarzio's [HH Wiring, 2 Humbucker, 3-way Blade Switch](https://www.dimarzio.com/media/1450) sheet is the standard alternative: "Position 1 = neck; Position 2 = neck & bridge; Position 3 = bridge."
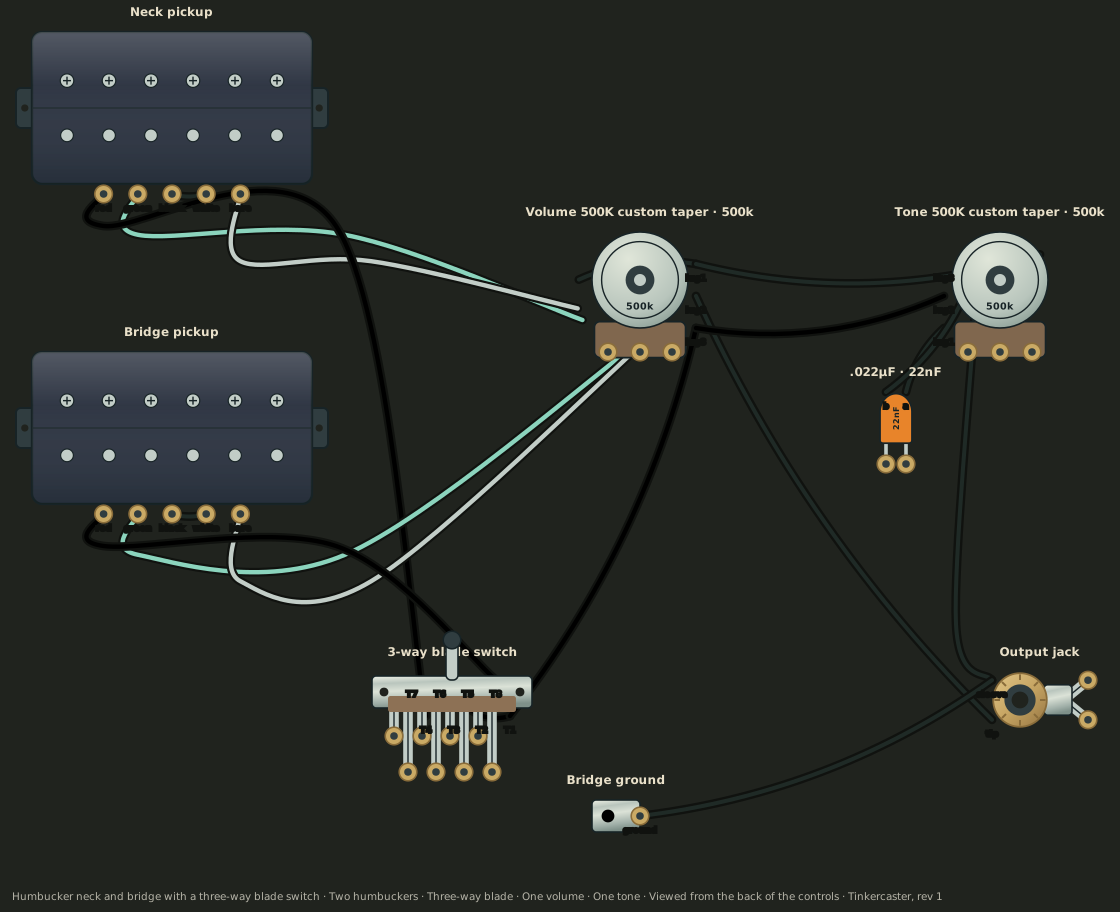
Humbucker neck and bridge with a three-way blade switch, drawn by Tinkercaster from DiMarzio's HH 3-way blade sheet (PDF). Open the full diagram.
On that sheet only the two red leads go to the switch. Each pickup's black and white are joined and insulated, and green and bare go to the volume casing. The blade picks which red reaches the volume, so the middle setting gives both full humbuckers in parallel:
| Selector | 3-way blade sheet | Petrucci 4PDT sheet |
| --- | --- | --- |
| Neck | Neck, both coils | Neck, both coils |
| Middle | Neck and bridge, both coils each, in parallel | One coil of each, in parallel |
| Bridge | Bridge, both coils | Bridge, both coils |
So, for "Petrucci wiring with a 3-way blade switch", the answer is that the blade sheet gives you neck, both and bridge with full humbuckers. To get the split middle that DiMarzio's Petrucci sheet describes, you need the EP1111 and the twelve-lug wiring above. Both sheets use the same 500K custom taper volume and tone, the same .022µF capacitor and the same jack wiring. Only the selector and the pickup leads change.
## Before you solder
- Check the selector in your hand. With a meter on continuity, confirm which outer lug each common reaches in each selector setting before you trust the A, B and C rows. The [multimeter course](/courses/multimeter) shows how.
- A4 and C3 each take two pickup leads. Tin and solder both leads together, and don't leave one of them on the volume casing out of habit.
- After wiring, test the three settings against the checks in [the diagram](/wiring-diagrams/dimarzio/john-petrucci-signature-4pdt-selector-volume-tone). With the volume at zero, tip and sleeve should read as a short in every setting.
## Next step
Keep the [John Petrucci Signature Model diagram](/wiring-diagrams/dimarzio/john-petrucci-signature-4pdt-selector-volume-tone) open at the bench. The [DiMarzio section of the library](/wiring-diagrams/dimarzio) has other DiMarzio layouts, and [How to wire a humbucker to a 3-way toggle](/blog/how-to-wire-a-humbucker-to-a-3-way-toggle) covers the two-humbucker toggle version.
## References
### From the Tinkercaster library
- [John Petrucci Signature Model, 4PDT selector, volume and tone](/wiring-diagrams/dimarzio/john-petrucci-signature-4pdt-selector-volume-tone) (DiMarzio): connections, lug codes and selector results
- [Humbucker neck and bridge with a three-way blade switch](/wiring-diagrams/dimarzio/humbucker-neck-and-bridge-three-way-blade) (DiMarzio): the blade comparison
- Catalog: [Rainmaker DP281](/catalog/dimarzio-dp281-rainmaker-neck), [Dreamcatcher DP282](/catalog/dimarzio-dp282-dreamcatcher-bridge), [EP1111 4PDT selector](/catalog/dimarzio-ep1111-4pdt-on-on-on), [CRL 3-Way Blade](/catalog/crl-3-way-blade), [CTS 500k Audio Pot](/catalog/cts-500k-audio-pot), [Orange Drop .022µF](/catalog/orange-drop-022uf), [Switchcraft #11](/catalog/switchcraft-11-jack)
### Manufacturer sources
- [DiMarzio, John Petrucci Signature Model Wiring](https://www.dimarzio.com/media/1589): "Up = Neck Pickup; Center = Neck/Bridge Split Inside Coils; and Down = Bridge Pickup"
- [DiMarzio, the same sheet as a PDF](https://d2emr0qhzqfj88.cloudfront.net/s3fs-public/2024-09/DiMarzio%20Wiring%20-%20John%20Petrucci%20Signature%20Model.pdf): part labels EP1111, EP1201, EP1022, EP1301, DP281, DP282
- [DiMarzio, EP1111 switch dimensions](https://d2emr0qhzqfj88.cloudfront.net/s3fs-public/diagrams/ep1111.pdf): contact chart for toggle up, center and toggle down
- [DiMarzio, HH Wiring, 2 Humbucker, 3-way Blade Switch](https://www.dimarzio.com/media/1450): "Position 1 = neck; Position 2 = neck & bridge; Position 3 = bridge"
- [DiMarzio, the blade sheet as a PDF](https://d2emr0qhzqfj88.cloudfront.net/s3fs-public/2023-09/DiMarzio%20HH%20Wiring%20-%202%20Humbucker%2C%203-way%20Blade%20Switch.pdf)