# How to solder guitar wiring (beginner's guide)
Canonical page: https://guitarwiring.app/blog/how-to-solder-guitar-wiring
By Tinkercaster · 2026-09-29
Soldering guitar wiring comes down to five kinds of joint: a wire to a lug, a wire to a pot casing, a pot lug bent onto its own casing, a jumper between switch lugs, and an insulated splice such as a humbucker's series link. Each needs a clean, tinned tip at the right temperature, parts that are hot enough to melt the solder themselves, and enough solder to wet both surfaces and no more. Then you prove each joint with a meter.
The five come straight from our library's drawings. Of the 330 diagrams in the [wiring diagram library](/wiring-diagrams), 308 route at least one connection to a pot casing, 136 bend a pot lug onto its casing, 82 run a wire from one switch lug to another, and 71 include a splice drawn as soldered and insulated. This guide works through a real harness joint by joint, with the numbers you need from the solder and iron makers.
Keep the [soldering cheat sheet](/cheatsheets/soldering) at the bench for the short version. The [bench skills course](/courses/bench-skills) takes you through wire preparation, soldering joints, component handling and harness assembly with measurement exercises.
## One harness, every joint type
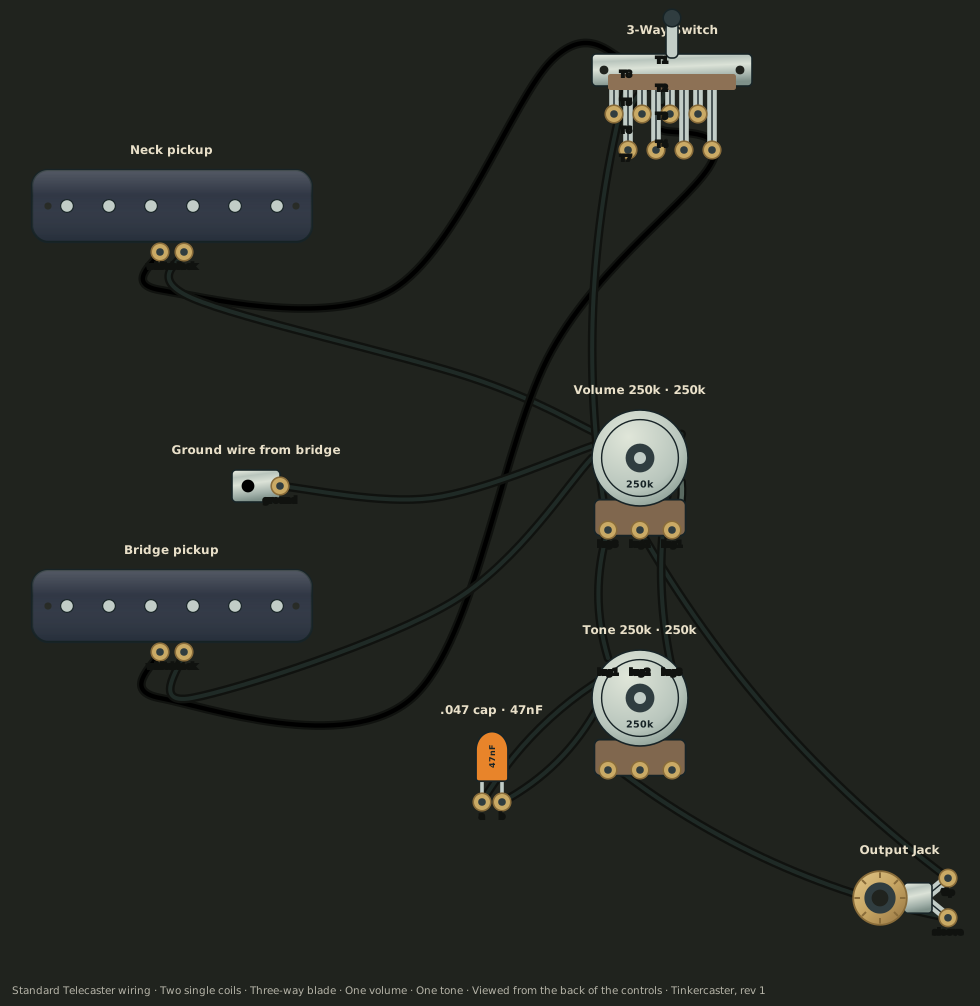
The [Seymour Duncan Standard Telecaster diagram](/wiring-diagrams/seymour-duncan/standard-telecaster) is a good specimen because it is small and uses four of the five joint types. Its parts, as the diagram lists them:
- Two Seymour Duncan single coils, each with a white and a black lead
- A three-way blade, drawn with a [CRL 3-Way Blade](/catalog/crl-3-way-blade) as the compatible example
- Volume 250k and tone 250k, with a [CTS 250k Audio Pot](/catalog/cts-250k-audio-pot) as the example
- A .047 cap (47nF), with an [Orange Drop .047µF](/catalog/orange-drop-047uf) as the example
- A [Switchcraft #11](/catalog/switchcraft-11-jack) output jack
- A ground wire from the bridge
Seymour Duncan Standard Telecaster, drawn by Tinkercaster from Seymour Duncan sheet Tele_Standard. Open the full diagram for every connection and bench check.
Here is what each of its 16 connections asks of your iron:
| Connections (as the diagram names them) | Joint type | What makes it difficult |
| --- | --- | --- |
| Neck black, bridge black and the bridge ground wire to the volume casing | Wire to casing | The casing is a large heat sink, and three wires share one spot |
| Volume right lug to the volume casing, "Lug bent onto the casing" | Lug bent onto casing | The lug and casing must both reach solder temperature at once |
| .047 cap to the tone casing; tone casing to jack sleeve; volume casing to tone casing | Wire to casing | Same heat problem, and a cap lead you don't want to cook |
| Switch top-left lug to second left lug, to third right lug, to bottom-right lug | Jumpers between switch lugs | Neighbouring lugs are close, and heat travels into the switch |
| Neck white and bridge white to the switch commons; switch to volume left lug; volume middle lug to jack tip; volume left lug to tone left lug; tone middle lug to cap | Wire to lug | The easy one, if the wire is tinned and hooked through first |
The diagram's switching table is short:
| Blade position | What reaches the output |
| --- | --- |
| Neck | Neck pickup |
| Neck + bridge | Neck and bridge pickups in parallel |
| Bridge | Bridge pickup |
Its bench checks test your soldering as well as the circuit. In each blade position, the meter across the jack should read the selected pickup, or both in parallel in the middle. With the volume at zero, tip and sleeve should read as a short. Both depend on casing joints: the pickups' black leads reach the jack sleeve through the volume and tone casings, and the zero-volume short also needs the bent-over volume lug to be properly soldered to its casing. A cold joint there can pass the first check and fail the second.
## Iron, tip and temperature
Use a temperature-controlled station. For guitar work you need heat reserve: the ability to hold tip temperature when you press it onto a pot casing that is soaking heat away. Seymour Duncan recommends [a station capable of 40 watts or more](https://www.seymourduncan.com/blog/latest-updates/how-to-use-a-soldering-iron) for exactly this reason. StewMac's [soldering mistakes guide](https://www.stewmac.com/video-and-ideas/online-resources/hardware-installation/how-not-to-mess-up-a-soldering-job/) makes the same point from the other side: an iron that is too weak forces you to hold it on so long that you cook the part anyway.
A small chisel tip covers every joint in the table above. The flat face transfers heat into a casing; the edge fits between switch lugs.
Set the temperature from the solder maker's data. Kester's [44 rosin core data sheet](https://www.kester.com/downloads?Command=Core_Download&EntryId=1072) and [alloy temperature chart](https://www.kester.com/knowledge-base/alloy-temperature-chart) give:
| Alloy | Melting point (Kester chart) | Typical tip temperature (Kester 44 data sheet) |
| --- | --- | --- |
| Sn63Pb37 (63/37) | 183°C, eutectic | 315 to 343°C (600 to 650°F) |
| Sn60Pb40 (60/40) | 183 to 190°C | 315 to 343°C (600 to 650°F) |
| Lead-free SAC or tin/copper | About 217 to 227°C, depending on alloy | 371 to 400°C (700 to 750°F) |
Kester's [lead-free hand soldering guide](https://www.kester.com/Portals/0/Documents/Knowledge%20Base/Lead-free-Hand-Soldering.pdf) adds the two failure boundaries: above 800°F (about 427°C) component damage becomes a risk, and at too low a temperature the typical complaints are cold joints. Hakko's guidance is to [keep the set temperature as low as practical](https://www.hakko.com/english/support/maintenance/detail.php?seq=103), because oxidation accelerates with heat, and it notes that lead-free solder oxidises a tip four to five times as fast as eutectic tin/lead.
Start at the bottom of Kester's range for your alloy. If a casing joint won't flow within a few seconds, raise the temperature in small steps or move to a larger tip. Don't compensate by holding the iron on longer.
## Solder and flux
63/37 is the easiest alloy to learn with. It is eutectic, so it goes from liquid to solid at a single temperature with no pasty stage, which means a joint that moves slightly as it cools is less likely to set grainy. 60/40 has a 7°C pasty range, per Kester's chart; it works well but must be held still until it sets. Lead-free needs roughly 55°C more at the tip, wets more slowly and is harder on tips.
Use thin, rosin-cored electronics solder. Seymour Duncan's [introduction to soldering](https://www.seymourduncan.com/blog/the-players-room/how-to-solder) recommends a diameter under 1 mm. The flux in the core is enough for fresh parts. Kester states that the residue of its 44 flux is non-corrosive and non-conductive and does not need removing for most applications. If you add separate flux for rework, follow that maker's cleaning instructions. Plumbing solder and acid flux have no place in a guitar.
## Wire: cloth push-back or PVC
Either insulation works electrically. They behave differently at the joint.
StewMac's [vintage push-back wire](https://www.stewmac.com/electronics/components-and-parts/wires/vintage-stranded-core-push-back-wire---50-feet/) is 22 AWG, stranded and pre-tinned, with a waxed braided cotton covering that pushes back to expose the conductor. There is nothing to strip, and the covering can be slid back up to the joint once it has cooled. PVC-insulated wire has to be stripped, and the insulation shrinks back and softens when the iron comes near it, so leave a small gap between insulation and joint.
For stranded wire, twist the strands tight and tin them before they go anywhere near a lug. Seymour Duncan insists on this step: solder wicks into the strands, stops them splaying, and turns the final joint into a two-second reflow.
## Technique, joint by joint
### Tin the tip, every time
Wipe the tip and melt fresh solder onto it before each session and whenever it looks dull. A wetted tip transfers heat into the joint through a liquid bridge; an oxidised one barely transfers heat at all. Hakko recommends leaving a coat of fresh solder on the tip before returning the iron to its holder and at the end of the day, to protect it from oxidation.
### Wire to lug
Tin the wire and the lug separately, as StewMac recommends. Hook the wire through the lug eye so it holds position mechanically. Put the tip against both lug and wire, and feed solder into the joint on the side away from the iron. Kester's instruction is explicit: heat the parts first, and don't apply solder to the tip itself. Remove the solder, then the iron, and leave the joint alone until it sets. StewMac notes that blowing on a joint to cool it is a reliable way to get a dull, weak one.
### Wire to pot casing
The pots in these diagrams are drawn with CTS audio pots as the compatible example ([CTS 500k Audio Pot](/catalog/cts-500k-audio-pot), [CTS 250k Audio Pot](/catalog/cts-250k-audio-pot)). CTS's [450G guitar pot data sheet](https://www.ctscorp.com/Files/DataSheets/Potentiometers/Potentiometer-450G-datasheet.pdf) describes that series as supplied with a tin-plated, solderable rear cover. The plating takes solder readily; the cover's mass is what makes the joint slow.
1. Scuff the spot. Seymour Duncan suggests fine sandpaper or a wire brush to remove the oily film new pots can carry.
2. Tin a pad on the casing before any wire goes near it: press the flat of the tip down with a little solder under it and let a small puddle flow.
3. Lay the tinned wires into the pad, clamp them if they won't sit still, and reflow.
Seymour Duncan warns that heating a pot for too long can damage its resistive track, and that if a joint won't take after a few seconds you should stop and regroup. If you need more heat, raise the temperature or use a bigger tip; long dwell times are what damage the track.
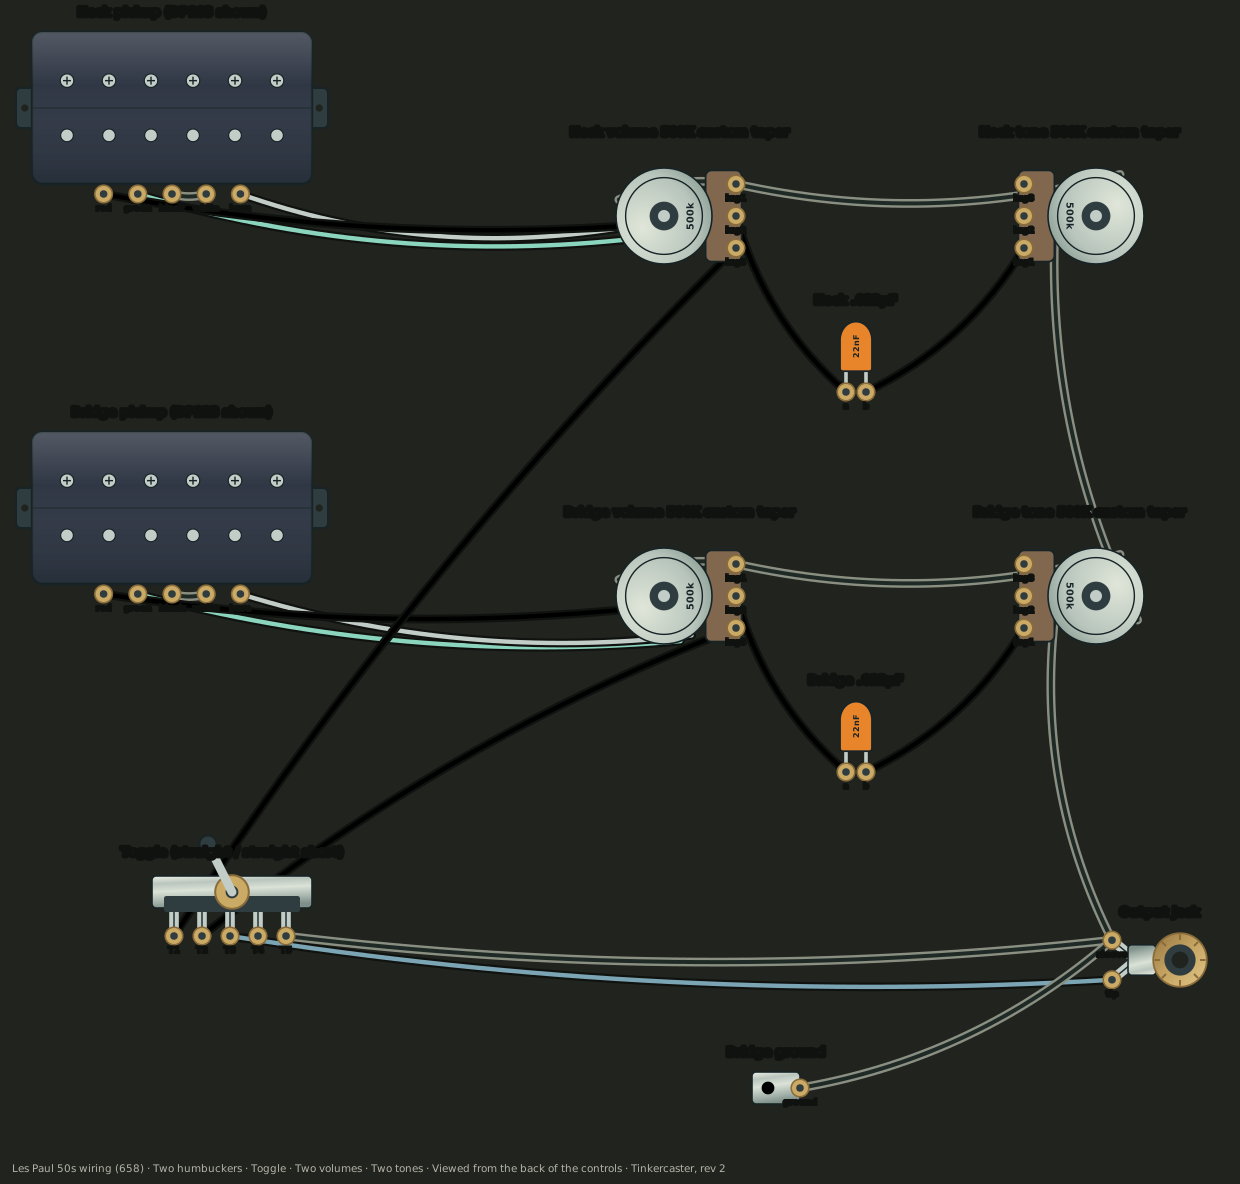
Casing joints in real harnesses often carry several wires. On the [DiMarzio Les Paul 50s wiring (658)](/wiring-diagrams/dimarzio/les-paul-50s-wiring-658), drawn with [DP103](/catalog/dimarzio-dp103-paf-36th-neck) and [DP223](/catalog/dimarzio-dp223-paf-36th-bridge) humbuckers, the neck volume casing takes the neck green, the neck bare, and a black wire from the volume's own top lug. The bridge tone casing takes the ground chain from the neck tone and a second wire down to the jack sleeve. Make one pad big enough for all of them, rather than stacking fresh joints on top of old ones.
DiMarzio Les Paul 50s wiring (658), drawn by Tinkercaster from DiMarzio's diagram PAF® 36th Anniversary with Straight Toggle Switch, revision 2. Open the full diagram for every connection and bench check.
### Lug bent onto the casing
On a volume pot, one outer lug goes to ground. In 136 of our diagrams that is done by bending the lug over until it touches the casing and soldering the two together, which saves a wire. On the Seymour Duncan Tele above, it is the volume right lug. Bend it before you solder anything else, so the joint isn't stressed afterwards, and tin the casing pad first. The lug heats quickly and the casing doesn't, so put the tip on the casing side and let the heat reach the lug.
### Jumpers between switch lugs
The Tele harness joins four blade lugs in a chain: top-left to second left, second left to third right, third right to bottom-right, and bottom-right on to the volume's input lug. The pickups land on the two common lugs. The jumpered lugs are the position contacts, and chaining them collects whichever pickup the blade selects into a single output. DiMarzio's [Standard Tele wiring](/wiring-diagrams/dimarzio/standard-tele-two-singles-three-way-volume-tone) does the same job with three jumpers on a CRL-type blade, though the drawn lugs differ, so wire from the diagram for your exact switch.
Use short, pre-tinned jumpers and tin each lug first so every joint is a quick reflow. Keep a crocodile clip on the lug between the joint and the switch body if a lug needs longer than a couple of seconds; StewMac recommends clip-on heat sinks for heat-sensitive parts. Check that no solder has bridged to the lug next door: a common bridged to a position contact can leave that pickup on in every position.
### Insulated splices and series links
On a four-conductor humbucker, the series link joins the two inner coil leads and must touch nothing else. The Tonerider and DiMarzio drawings join black and white; Seymour Duncan's join red and white, as its [humbucker internals article](https://www.seymourduncan.com/blog/latest-updates/guitar-wiring-explored-humbucker-internals) explains. Twist, solder, and insulate with heat-shrink slid on before you solder.
That joint is the electrical midpoint between the two coils. If it touches ground, the coil between the link and ground is shorted out, and the humbucker behaves like a single coil (which is exactly how a coil split works on purpose). Our diagrams check this directly: "each taped black and white joint should read open to ground" on the DiMarzio and Tonerider drawings, and the same for red and white on Seymour Duncan's.
## Inspect, then measure
A good tin/lead joint is smooth and bright, with solder drawn up both surfaces into a concave fillet and the wire's outline still visible. Seymour Duncan and StewMac both describe a dull, grey surface as a joint that has not bonded. A ball sitting on top of a lug means the lug was never hot enough. Seymour Duncan's advice is to redo it now rather than open the guitar again later.
A joint that looks right can still fail, so run the diagram's bench checks with the harness out of the guitar: pickup readings across the jack in each switch position, a short at volume zero, and series links open to ground. The [multimeter course](/courses/multimeter) covers continuity mapping and component measurement. If a pickup is silent after all that, work through [how to fix a dead pickup](/blog/how-to-fix-a-dead-pickup).
## Safety at the bench
- Unplug the guitar from the amp and remove any battery before you solder.
- Wear eye protection. Seymour Duncan warns that [hot solder can flick up into your face](https://www.seymourduncan.com/blog/latest-updates/how-to-use-a-soldering-iron), and UC San Diego's [lead soldering guidance](https://blink.ucsd.edu/safety/occupational/hazard-control/lead-soldering.html) calls for safety glasses when soldering and clipping wires.
- Extract or ventilate. The UK Health and Safety Executive identifies [rosin-based solder flux fume](https://www.hse.gov.uk/pubns/indg249.pdf) as a cause of occupational asthma. Weller's [solder fume guidance](https://www.weller-tools.com/us/en/filtration/solder-fumes) reports that lead-free soldering puts up to 250% more particles into the breathing zone than leaded soldering, so switching alloy doesn't remove the need.
- With leaded solder, wash your hands when you finish and don't eat or drink at the bench. UC San Diego lists ingestion and inhalation as the exposure routes.
- Keep the iron in its stand whenever it leaves your hand, and cover the guitar's finish around the cavity.
## Where to go next
Open the [Seymour Duncan Standard Telecaster diagram](/wiring-diagrams/seymour-duncan/standard-telecaster) and work through its connection list with your own parts on the bench. The library, catalog, courses and cheat sheet are free, and so is opening that diagram in the workbench to save and customise the board. With [Tinkercaster Pro](/pricing), you can also ask Luthier about a joint and follow a guided build that records your meter checks step by step. [From wiring diagram to your next solder joint](/blog/from-wiring-diagram-to-soldering) explains how that works.
Related: [how to wire a guitar output jack](/blog/how-to-wire-a-guitar-output-jack), [how to shield a guitar cavity](/blog/how-to-shield-a-guitar-cavity) and [why is my guitar buzzing?](/blog/why-is-my-guitar-buzzing), where a cold ground joint is a common suspect.
## References
### From the Tinkercaster library
- [Seymour Duncan Standard Telecaster wiring](/wiring-diagrams/seymour-duncan/standard-telecaster): parts, connections, switching table and bench checks walked through above
- [DiMarzio Les Paul 50s wiring (658)](/wiring-diagrams/dimarzio/les-paul-50s-wiring-658): multi-wire casing grounds and taped series links
- [DiMarzio Standard Tele wiring](/wiring-diagrams/dimarzio/standard-tele-two-singles-three-way-volume-tone): switch lug jumpers on a Tele blade
- Catalog: [CRL 3-Way Blade](/catalog/crl-3-way-blade), [CTS 250k Audio Pot](/catalog/cts-250k-audio-pot), [CTS 500k Audio Pot](/catalog/cts-500k-audio-pot), [Orange Drop .047µF](/catalog/orange-drop-047uf), [Switchcraft #11](/catalog/switchcraft-11-jack), [DiMarzio DP103](/catalog/dimarzio-dp103-paf-36th-neck), [DiMarzio DP223](/catalog/dimarzio-dp223-paf-36th-bridge)
- [Soldering cheat sheet](/cheatsheets/soldering), [bench skills course](/courses/bench-skills), [multimeter course](/courses/multimeter)
### Manufacturer and technical sources
- [Kester 44 flux-cored wire technical data sheet](https://www.kester.com/downloads?Command=Core_Download&EntryId=1072): tip temperatures for leaded and lead-free alloys, heat the parts before applying solder, flux residue properties
- [Kester alloy temperature chart](https://www.kester.com/knowledge-base/alloy-temperature-chart): melting points of Sn63Pb37, Sn60Pb40 and lead-free alloys
- [Kester lead-free hand soldering](https://www.kester.com/Portals/0/Documents/Knowledge%20Base/Lead-free-Hand-Soldering.pdf): lead-free melting points, damage risk above 800°F, cold joints at low temperature
- [Hakko: tip oxidation with lead-free solder](https://www.hakko.com/english/support/maintenance/detail.php?seq=103): oxidation rate, keeping temperature low, tinning the tip before storing
- [CTS Series 450G data sheet](https://www.ctscorp.com/Files/DataSheets/Potentiometers/Potentiometer-450G-datasheet.pdf): tin-plated solderable rear cover and solder lug terminals
- [Weller: solder fumes](https://www.weller-tools.com/us/en/filtration/solder-fumes): fume hazards and lead-free particle levels
- [UK HSE: controlling health risks from rosin-based solder flux fume](https://www.hse.gov.uk/pubns/indg249.pdf): occupational asthma, control measures
- [UC San Diego: lead soldering safety](https://blink.ucsd.edu/safety/occupational/hazard-control/lead-soldering.html): hand-washing, eating and drinking, ventilation, eye protection
- [Seymour Duncan: how to solder](https://www.seymourduncan.com/blog/the-players-room/how-to-solder): solder diameter, tinning stranded wire, scuffing and tinning pot backs, heat time, cold joints
- [Seymour Duncan: how to use a soldering iron](https://www.seymourduncan.com/blog/latest-updates/how-to-use-a-soldering-iron): 40 W station for pot backs, safety glasses
- [Seymour Duncan: humbucker internals explored](https://www.seymourduncan.com/blog/latest-updates/guitar-wiring-explored-humbucker-internals): red and white series link on Seymour Duncan four-conductor pickups
- [StewMac: how not to mess up a soldering job](https://www.stewmac.com/video-and-ideas/online-resources/hardware-installation/how-not-to-mess-up-a-soldering-job/): iron power, tinning parts separately, not blowing on joints, clip-on heat sinks
- [StewMac vintage push-back wire](https://www.stewmac.com/electronics/components-and-parts/wires/vintage-stranded-core-push-back-wire---50-feet/): 22 AWG, stranded, pre-tinned, push-back cloth covering