# How to wire a guitar output jack
Canonical page: https://guitarwiring.app/blog/how-to-wire-a-guitar-output-jack
By Tinkercaster · 2026-09-29
A passive guitar uses a two-conductor mono jack. The hot wire from the volume pot's middle lug goes to the tip lug, and one ground wire from the pot casings goes to the sleeve lug. An active guitar uses a three-conductor stereo jack in the same way, plus one more wire: the battery negative goes to the ring lug, and inserting a mono plug connects the ring to the sleeve, which switches the battery on. The rest of the job is identifying which lug is which on the part in your hand and making joints that survive a cable being yanked.
This article covers the Switchcraft #11 mono jack and the Switchcraft #12B stereo jack, the two jacks our diagrams name as compatible examples, and the cups and plates that hold them in Strat- and Tele-style bodies.
## What the library uses
In our library of 330 diagrams, 314 name the [Switchcraft #11](/catalog/switchcraft-11-jack) as the compatible output jack and 15 name the [Switchcraft #12B](/catalog/switchcraft-12b-stereo-jack). All 15 stereo-jack diagrams are Seymour Duncan active sets: six for Dave Mustaine actives, six for Blackouts and three for Live Wire single coils. The remaining diagram is a Music Man sheet that ends at an off-board preamp and draws no jack at all.
| Jack | Conductors | Lugs | Used for |
| --- | --- | --- | --- |
| [Switchcraft #11](/catalog/switchcraft-11-jack) | 2, open circuit | Tip, sleeve | Every passive circuit in our library |
| [Switchcraft #12B](/catalog/switchcraft-12b-stereo-jack) | 3, open circuit | Tip, ring, sleeve | Active pickups: ring switches the battery |
| [Switchcraft 152B](/catalog/switchcraft-152b) | 3 | Tip, ring, sleeve | Thick-panel barrel or endpin mount |
| [Switchcraft 12A](/catalog/switchcraft-12a) | 2 plus a shunt | Tip, sleeve, tip shunt (normally closed when empty) | Not used in our diagrams. The extra lug is a trap when identifying lugs |
Switchcraft's customer drawing for the #11 names two terminals, [tip terminal and sleeve terminal](https://www.switchcraft.com/assets/1/24/11_CD.pdf), with a nickel silver tip spring, an electro-tinned copper alloy sleeve terminal, phenolic insulating washers and a 3/8-32 UNEF-2A thread. The [#12B drawing](https://www.switchcraft.com/assets/1/24/12B_CD.pdf) adds a ring spring and describes the part as a 1/4 in three-conductor open-circuit jack, with the same thread.
## How a mono jack works
Fralin's jack guide describes the mechanism from the cable end. The [plug's tip is the hot signal and its sleeve is ground](https://www.fralinpickups.com/2018/06/25/how-to-install-an-output-jack/), separated by an insulator. When you insert the plug, its sleeve slides into the jack's metal tube (the sleeve connection) and the plug's tip snaps into the tip arm, which is insulated from the rest of the jack between layers of phenolic. That snap is the tip spring's tension holding the plug.
Those two contacts are also where jacks fail. The tip spring loses tension so contact becomes intermittent, and the sleeve's contact loosens with the jack's mounting.
## Walkthrough: a mono jack in a one-humbucker circuit
Seymour Duncan's simplest humbucker layout isolates the jack wiring from everything else.
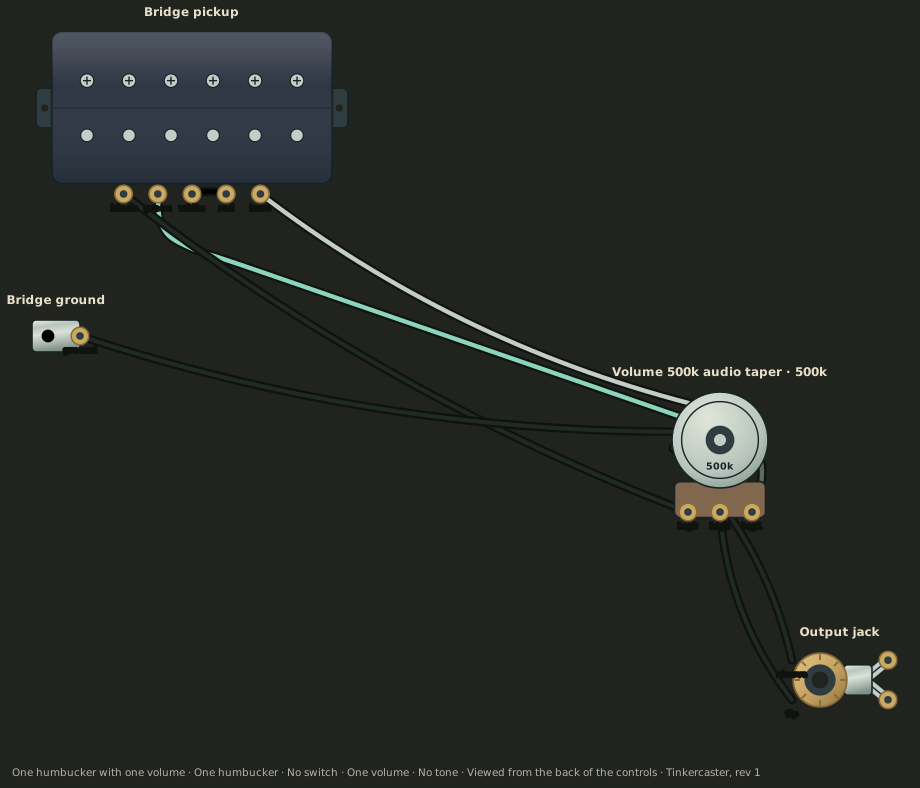
One humbucker with one volume, drawn by Tinkercaster from Seymour Duncan sheet 1H_1V. Open the full diagram for every connection and bench check.
Parts: a four-conductor Seymour Duncan bridge humbucker, a 500k audio-taper volume (compatible example [CTS 500k audio pot](/catalog/cts-500k-audio-pot)), a Switchcraft #11 output jack and a bridge ground wire. The diagram lists eight connections:
| # | Connection | Why |
| --- | --- | --- |
| 1 | Bridge ground → volume casing (upper solder spot) | Grounds the strings |
| 2 | Pickup green → volume casing | Coil return |
| 3 | Pickup bare shield → volume casing | Cover and braid to ground |
| 4 | Volume right lug → volume casing (lower solder spot) | Grounded end of the track |
| 5 | Jack sleeve → volume casing (upper solder spot) | The ground return to the amp. The drawing notes it crosses the bridge ground wire without joining it |
| 6 | Pickup red → pickup white, soldered and taped | Series link between the coils; touches nothing else |
| 7 | Pickup black → volume left lug (input) | Hot, in Seymour Duncan's colour code |
| 8 | Volume middle lug → jack tip | The wiper carries the volume-controlled signal to the tip |
The diagram's bench checks, before plugging in:
- With the volume up, the meter across the jack should read the full humbucker's resistance (both coils).
- The taped red and white joint should read open to ground.
Add a check of your own. The volume-at-zero check that appears on 71 of our diagrams (tip and sleeve read as a short) proves the tip wire reaches the wiper, but it cannot tell you whether tip and sleeve are swapped, because a short reads the same in both directions. Fralin warns that wiring the jack backwards reverses hot and ground. To catch that, probe from the sleeve lug to the volume casing: it must read continuity. Tonerider's [one P90 with one volume](/wiring-diagrams/tonerider/one-p90-one-volume) diagram lists exactly that check: the jack sleeve should read continuity to the volume casing and the bridge ground wire.
## Identifying lugs with a meter
Drawings show the lug layout of a named part. A different brand, an import jack or a worn part may not match, so identify lugs on the physical jack before soldering.
1. Set the meter to continuity or low resistance.
2. Insert a mono plug (a patch cable end is fine).
3. Probe the plug's tip against each lug. The lug that reads a short is the tip lug. On a Switchcraft #11 it is the lug on the spring arm.
4. Probe the plug's sleeve against the remaining lugs. The lug that reads a short is the sleeve lug, and it will also read a short to the threaded bushing.
5. On a stereo jack, the remaining lug is the ring. With a mono plug inserted it should now read a short to the sleeve lug. Remove the plug and it should read open. That is the battery switch.
6. If a mono jack has a third lug that reads a short to the tip lug with no plug inserted and opens when a plug goes in, it is a switching jack with a tip shunt, such as the [Switchcraft 12A](/catalog/switchcraft-12a). It is not a stereo jack and will not switch a battery.
## Walkthrough: a stereo jack as a battery switch
StewMac's output-jack guide describes the principle: a stereo jack can turn on an onboard battery when a mono plug is inserted, by [using the ring connector to complete the ground side of the active circuit](https://www.stewmac.com/video-and-ideas/online-resources/learn-about-guitar-pickups-and-electronics-and-wiring/understanding-guitar-wiring-part-7-output-jacks/). A mono plug's sleeve is long enough to touch both the jack's ring contact and its sleeve contact, so it shorts ring to sleeve. Our catalog entry for the #12B says the ring contact closes the battery negative to ground only while a mono plug is inserted, so active pickups switch off when unplugged. It also means the battery draws current for as long as a cable is left in the jack.
Seymour Duncan's one-Blackout, one-volume sheet shows the minimum circuit.
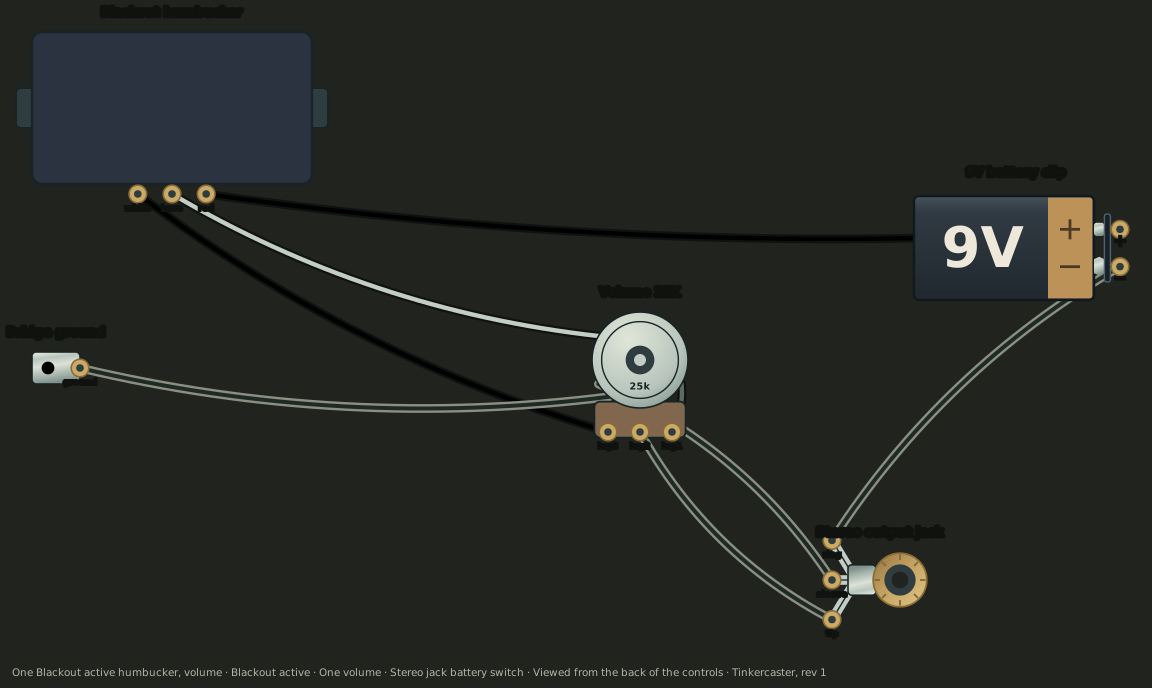
One Blackout active humbucker with one volume, drawn by Tinkercaster from Seymour Duncan sheet 1BO_1V. Open the full diagram for every connection.
Parts: a Blackout active humbucker, a 25k volume (compatible example EMG 25K pot), a stereo output jack (compatible example Switchcraft #12B), a 9 V battery clip and a bridge ground. The diagram notes that white is the signal lead, bare is ground and red is +9 V as drawn on the source sheet.
| # | Connection | Why |
| --- | --- | --- |
| 1 | Blackout gnd → volume casing (bare) | Pickup ground |
| 2 | Volume lug1 → volume casing | Grounded end of the track |
| 3 | Stereo jack sleeve → volume casing | Ground return to the amp |
| 4 | Bridge ground → volume casing | Strings |
| 5 | Blackout hot → volume lug3 (white) | Signal into the volume |
| 6 | Blackout vplus → battery clip vplus (red) | Battery positive is permanently connected to the pickup |
| 7 | Battery clip vminus → stereo jack ring (black) | Battery negative waits at the ring |
| 8 | Volume lug2 → stereo jack tip | Signal out |
Connection 6 keeps the positive side live at all times, so the circuit is completed only when the ring meets the sleeve. Seymour Duncan's own [two-Blackout, two-volume sheet](https://www.seymourduncan.com/images/wiring-diagrams/2BO_3G_2V.pdf) labels the jack lugs "Tip (hot output)", "Ring (battery ground)" and "Sleeve (ground). The inner, circular portion of the jack", and draws 25k volumes. That value belongs to the active pickup: use the pot value the pickup maker's sheet specifies rather than the 250k or 500k pots of a passive harness (see [250k vs 500k pots](/blog/250k-vs-500k-pots) for why passive values matter).
The Live Wire sets add a second battery.
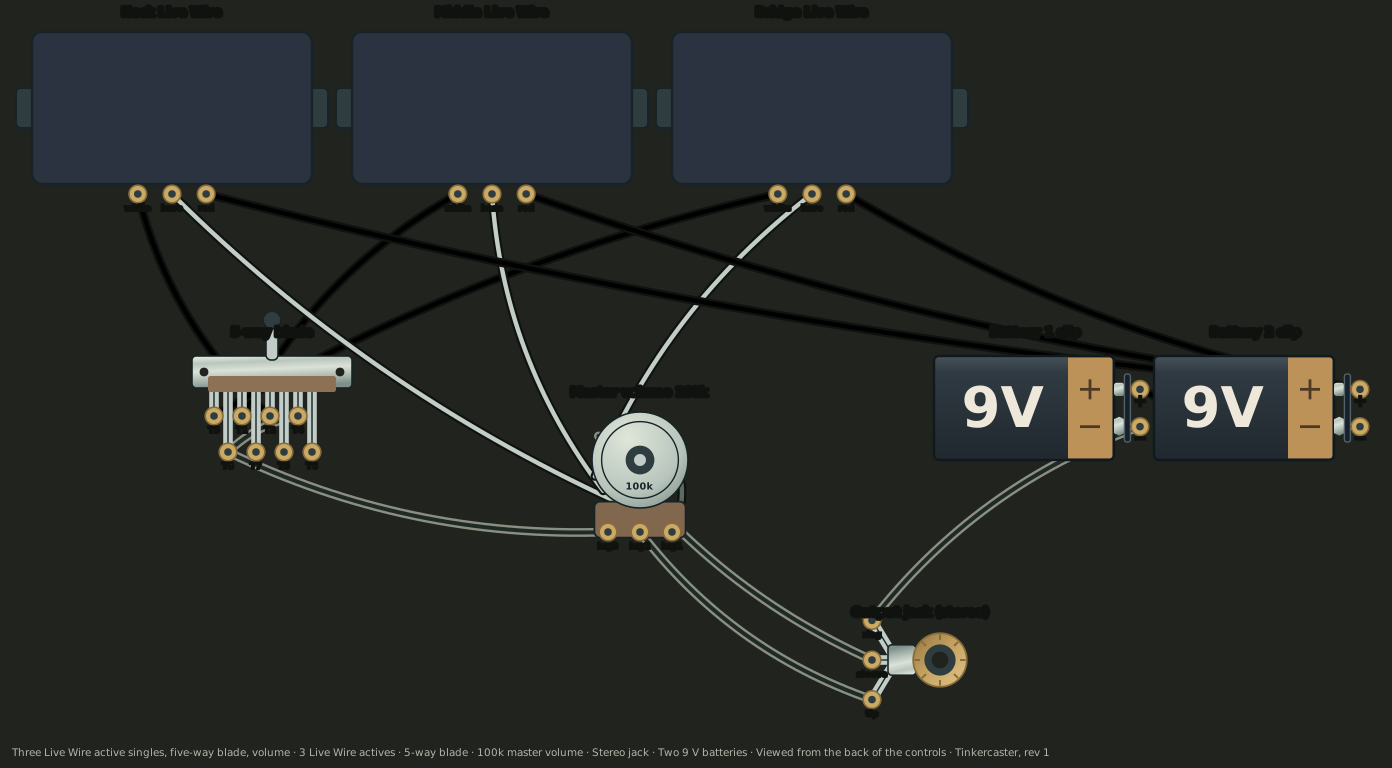
Three Live Wire active singles, five-way blade, volume, drawn by Tinkercaster from Seymour Duncan sheet 3aS_5W_1V. Open the full diagram for every connection and bench check.
Here two 9 V batteries are drawn in series: the left clip's red lead and the right clip's black lead meet at a sleeved joint between them, the right clip's red joins the three pickups' red leads, and the left clip's black goes to the jack's "Ring (battery ground)". The pot is 100k, and the sheet prints no taper. The same ring still switches the whole supply.
Measure it before you plug into an amp:
| Test | Plug | Expected |
| --- | --- | --- |
| Battery negative (ring lug) to sleeve lug | None | Open |
| Ring lug to sleeve lug | Mono plug inserted | Short: the plug's sleeve bridges them |
| Joined red leads to ground, meter on DC volts | Mono plug inserted | The battery voltage; on the Live Wire circuit, the two batteries in series |
| Joined red leads to ground, DC volts | None | No complete circuit to ground through the ring |
The first three rows follow the Live Wire diagram's bench checks. Use a mono plug for the second check: a stereo plug keeps its ring and sleeve insulated from each other, so it never completes the battery circuit, as the catalog entry and StewMac describe. Fishman's Switchjack endpin, made for Fishman by Switchcraft, uses a separate fourth "Switch" terminal for the same job, with the [negative battery wire to Switch](https://www.stewmac.com/globalassets/video-and-ideas/online-resources/building-instruments/switchjack-endpin-jack/switchjack-endpin-jack-diagrams), so on that part the ring is free for a second signal.
For switching between active and passive modes rather than just powering the preamp, see the [Seymour Duncan active/passive preamp bypass guide](/wiring-guides/seymour-duncan/active-passive-switching).
## Soldering the lugs
Fralin's installation steps are to [pre-tin the terminals and the wire, and kink the wire through the lug](https://www.fralinpickups.com/2018/06/25/how-to-install-an-output-jack/) to make a mechanical connection before soldering; white to tip, black to sleeve. StewMac's Strat harness instructions use the same convention, [white to the jack tip and black to the sleeve](https://www.stewmac.com/globalassets/video-and-ideas/online-resources/pickups-and-electronics/golden-age-pre-wired-harness-for-stratocaster-instructions/installation-instructions-for-strat-wiring-harness), with the wires threaded through the body's access hole first.
Leave enough slack that the jack can be pulled out of its cup for service without stressing the joints, and dress the tip wire so it cannot touch the sleeve lug or the bushing when the nut is tightened. Heat technique and iron temperatures are in [how to solder guitar wiring](/blog/how-to-solder-guitar-wiring). Solder with the guitar unplugged from any amp and, on an active guitar, the battery removed.
## Crackle, cut-outs and loose jacks
| Symptom | Mechanism | Fix |
| --- | --- | --- |
| Crackle when the plug moves, cable falls out easily | Tip spring has lost tension; the plug's tip is not held against the contact | Replace the jack. A multi-contact jack such as the [Pure Tone](/catalog/pure-tone-multi-contact-jack) adds contact points; StewMac describes it as having [dual tension grounds and dual positive tips](https://www.stewmac.com/electronics/components-and-parts/jacks/pure-tone-multi-contact-1-4-output-jack/) |
| Crackle when the jack itself moves in the body | The jack or its cup is loose, flexing the solder joints | Tighten without twisting (below), or refit the cup |
| Dead with a cable in, works when pressed | Cold or cracked joint on the tip or sleeve lug | Reflow; check sleeve continuity to the casing |
| Active guitar cuts out or never powers up | Ring lug joint, dead battery, or a stereo cable in the jack | Meter the ring-to-sleeve switch with a mono plug |
### Tightening a Strat-style recessed jack without twisting the wires
Turning the nut from outside drags the whole jack round with it and twists the wires on the lugs. StewMac's Jack the Gripper locks inside the jack so you can [tighten the nut without spinning the jack](https://www.stewmac.com/video-and-ideas/tool-demo-videos/luthier-tools-and-supplies-videos/jack-the-gripper/), and they describe it as suited to recessed Stratocaster jacks. The StewMac Bullet tightener does the same with a stopper in the jack and a free-turning socket over the nut, working [from the outside to prevent twisting and breaking the solder joints](https://www.stewmac.com/luthier-tools-and-supplies/tools-by-job/tools-for-electronics/bullet-guitar-jack-tightener/). StewMac lists versions for 1/2 in nuts on standard jacks and 11 mm nuts, which it notes are common on imported instruments. Measure your nut before buying.
If you have the jack out of the guitar, hold the jack body with the lugs clear while you tighten, so nothing rotates.
### Telecaster jack cups and the Electrosocket
The Tele cup is held in its hole by a metal retainer clip. StewMac explains the failure: stress on the jack moves the clip and it [works loose over time](https://www.stewmac.com/video-and-ideas/trade-secrets/how-to-fix-a-noisy-jack-in-a-telecaster/), and cables being forced in or guitars leaned on their plugged-in cables accelerate it, producing pops, crackle and dropouts. There are two fixes. Reinstall a new retainer clip with a Tele jack installation tool, rebuilding a damaged hole with epoxy and sawdust if necessary. Or replace the clip with an Electrosocket, which StewMac describes as a machined aluminium cup [threaded to accept a 1/4 in jack](https://www.stewmac.com/video-and-ideas/online-resources/learn-about-guitar-pickups-and-electronics-and-wiring/two-ways-to-fix-a-telecasters-wobbly-input-jack/) and fixed with two small screws, which means drilling two pilot holes. Our catalog lists the [Electrosocket Tele jack mount](/catalog/electrosocket-mount) as a mono jack plate with tip and sleeve terminals.
## Next step
Open the [Seymour Duncan one humbucker, one volume](/wiring-diagrams/seymour-duncan/one-humbucker-one-volume) diagram for a mono jack, or the [one Blackout active humbucker, volume](/wiring-diagrams/seymour-duncan/one-blackout-active-humbucker-volume) diagram for a battery-switched stereo jack, and compare its jack connections with the part in your hand. The library, the catalog, the [multimeter course](/courses/multimeter) introduction (its fourth chapter covers output jack tests) and the [soldering cheat sheet](/cheatsheets/soldering) are free, and so is opening the diagram in the workbench to save and customise your own board. [Tinkercaster Pro](/pricing) adds Luthier, who can help with a lug you cannot identify, and a guided build with meter checks at each step.
## References
### From the Tinkercaster library
- [One humbucker with one volume](/wiring-diagrams/seymour-duncan/one-humbucker-one-volume) (Seymour Duncan 1H_1V): mono jack connections and bench checks
- [One P90 with one volume](/wiring-diagrams/tonerider/one-p90-one-volume) (Tonerider 1_P90_1V): sleeve continuity check
- [One Blackout active humbucker, volume](/wiring-diagrams/seymour-duncan/one-blackout-active-humbucker-volume) (Seymour Duncan 1BO_1V): stereo jack battery switch
- [Three Live Wire active singles, five-way blade, volume](/wiring-diagrams/seymour-duncan/three-live-wire-singles-five-way-volume) (Seymour Duncan 3aS_5W_1V): two batteries in series, ring checks
- [Seymour Duncan active/passive preamp bypass explained](/wiring-guides/seymour-duncan/active-passive-switching)
- Catalog: [Switchcraft #11](/catalog/switchcraft-11-jack), [Switchcraft #12B](/catalog/switchcraft-12b-stereo-jack), [Switchcraft 152B](/catalog/switchcraft-152b), [Switchcraft 12A](/catalog/switchcraft-12a), [Pure Tone multi-contact jack](/catalog/pure-tone-multi-contact-jack), [Electrosocket Tele jack mount](/catalog/electrosocket-mount), [CTS 500k audio pot](/catalog/cts-500k-audio-pot)
- [Using a multimeter for guitar wiring](/courses/multimeter), [Soldering cheat sheet](/cheatsheets/soldering)
### Manufacturer and technical sources
- [Switchcraft, #11 customer drawing (PDF)](https://www.switchcraft.com/assets/1/24/11_CD.pdf): tip and sleeve terminals, materials, 3/8-32 UNEF-2A thread, open circuit
- [Switchcraft, #12B customer drawing (PDF)](https://www.switchcraft.com/assets/1/24/12B_CD.pdf): tip spring, ring spring, sleeve terminal, three-conductor open circuit
- [Fralin Pickups, How to properly install an output jack](https://www.fralinpickups.com/2018/06/25/how-to-install-an-output-jack/): tip hot and sleeve ground, tip arm insulated by phenolic, pre-tin and kink, white to tip, black to sleeve, reversed wiring
- [StewMac, Understanding guitar wiring part 7: output jacks](https://www.stewmac.com/video-and-ideas/online-resources/learn-about-guitar-pickups-and-electronics-and-wiring/understanding-guitar-wiring-part-7-output-jacks/): stereo jack ring completes the active circuit's ground when a mono plug is inserted
- [Seymour Duncan, 2 Blackout active humbuckers, 2 volume, 3-way toggle (PDF)](https://www.seymourduncan.com/images/wiring-diagrams/2BO_3G_2V.pdf): ring as battery ground, sleeve and tip labels, 25k volumes
- [Fishman Switchjack diagrams, hosted by StewMac (PDF)](https://www.stewmac.com/globalassets/video-and-ideas/online-resources/building-instruments/switchjack-endpin-jack/switchjack-endpin-jack-diagrams): separate switch terminal for battery negative, made for Fishman by Switchcraft
- [StewMac, Strat wiring harness installation instructions (PDF)](https://www.stewmac.com/globalassets/video-and-ideas/online-resources/pickups-and-electronics/golden-age-pre-wired-harness-for-stratocaster-instructions/installation-instructions-for-strat-wiring-harness): white to tip, black to sleeve
- [StewMac, Pure Tone multi-contact output jack](https://www.stewmac.com/electronics/components-and-parts/jacks/pure-tone-multi-contact-1-4-output-jack/): dual tension grounds and dual positive tips
- [StewMac, Jack the Gripper](https://www.stewmac.com/video-and-ideas/tool-demo-videos/luthier-tools-and-supplies-videos/jack-the-gripper/): tighten without spinning the jack, recessed Strat jacks
- [StewMac, Bullet guitar jack tightener](https://www.stewmac.com/luthier-tools-and-supplies/tools-by-job/tools-for-electronics/bullet-guitar-jack-tightener/): prevents twisting solder joints, 1/2 in and 11 mm nut versions
- [StewMac, How to fix a noisy jack in a Telecaster](https://www.stewmac.com/video-and-ideas/trade-secrets/how-to-fix-a-noisy-jack-in-a-telecaster/): loose retainer clip causes pops and dropouts
- [StewMac, Two ways to fix a Telecaster's wobbly input jack](https://www.stewmac.com/video-and-ideas/online-resources/learn-about-guitar-pickups-and-electronics-and-wiring/two-ways-to-fix-a-telecasters-wobbly-input-jack/): retainer clip replacement, epoxy repair, Electrosocket threaded cup with two screws