 Tinkercaster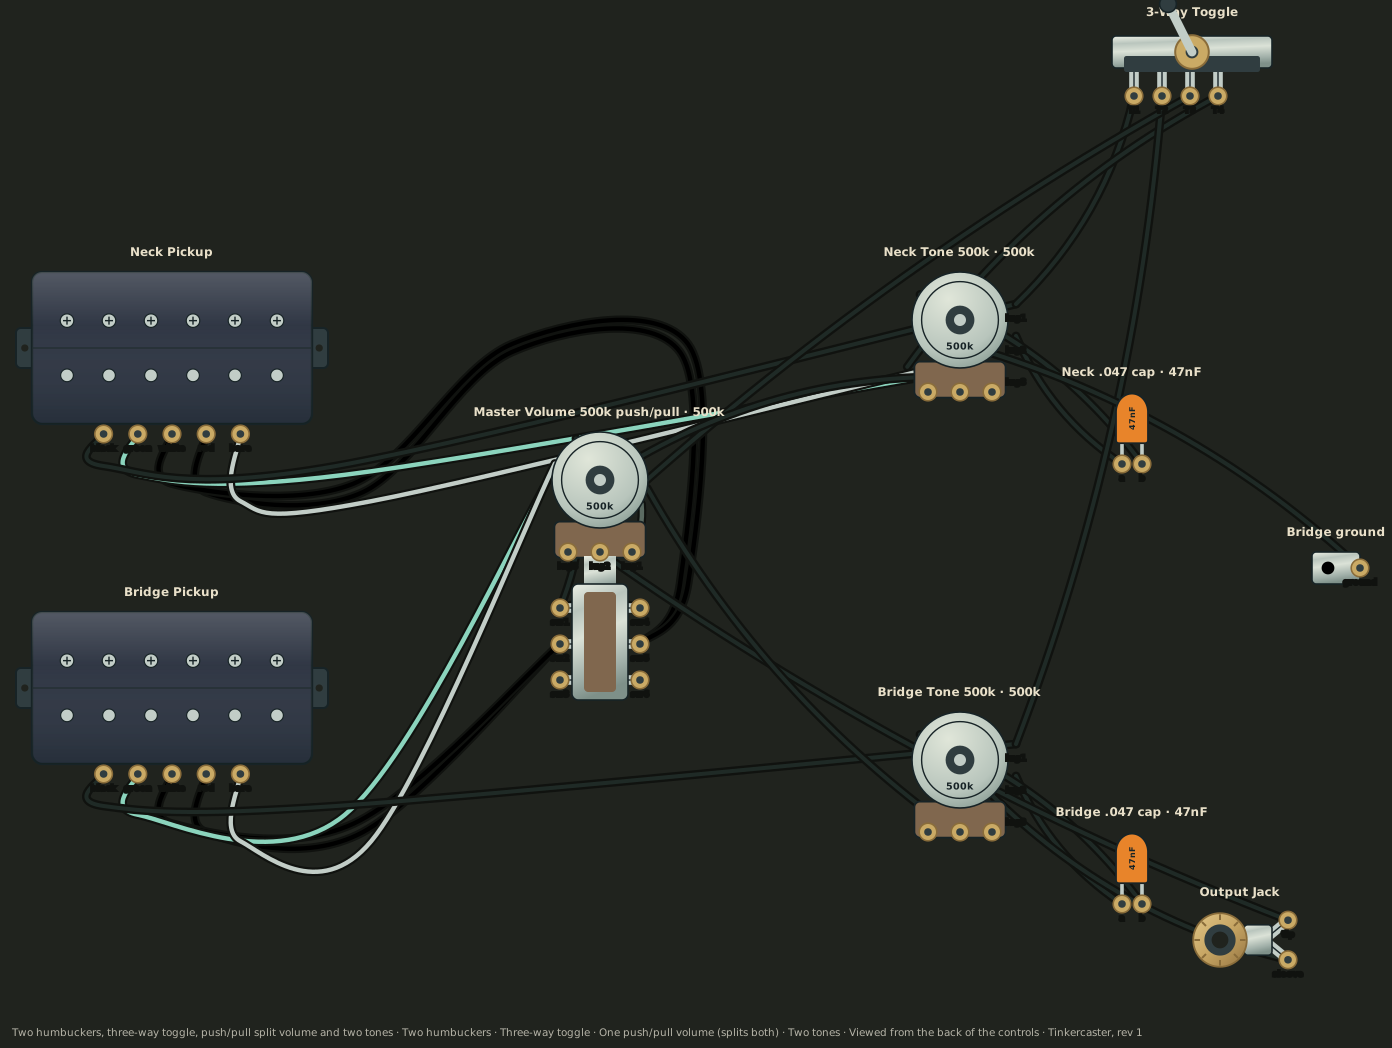
Parts and values
| In the drawing | Value | Part |
|---|---|---|
| Neck PickupSource: Seymour Duncan Neck Pickup | — | Humbucker (four-conductor, Seymour Duncan colours)Generic |
| Bridge PickupSource: Seymour Duncan Bridge Pickup | — | Humbucker (four-conductor, Seymour Duncan colours)Generic |
| 3-Way ToggleSource: 3 way toggle (unlabelled) | — | Switchcraft 3-Way ToggleExample part |
| Master Volume 500k push/pull | 500k | 500k Push-Pull DPDTExample part |
| Neck Tone 500k | 500k | CTS 500k Audio PotExample part |
| Output Jack | — | Switchcraft #11Example part |
| Bridge Tone 500k | 500k | CTS 500k Audio PotExample part |
| Bridge groundSource: Bridge ground wire | — | Bridge ground wireGeneric |
| Neck .047 capSource: .047 cap on the neck tone (drawn green) | 47nF | Orange Drop .047µFExample part |
| Bridge .047 capSource: .047 cap on the bridge tone (drawn green) | 47nF | Orange Drop .047µFExample part |
“Example part” means any part with the same value and lugs will do; the source does not name a brand. “Generic” stands in for an unspecified pickup: check your own pickup's lead colours before you solder.
Specific to this wiring
- The source says the push/pull split switch splits both pickups.
- Each pickup's red and white leads are soldered together onto one middle lug of the switch, not taped off: bridge on the left column, neck on the right.
- The two bottom switch lugs (nearest the pot) are jumpered together and wired to the volume casing; the top row stays empty.
- Each pickup's black lead goes to the outer lug of its own tone pot, and that lug continues to the toggle.
- The neck green and bare, the toggle's frame lug and the bridge ground wire end on the neck tone casing; the bridge green and bare end on the volume casing; the jack sleeve ends on the bridge tone casing.
- The three pot casings are linked: neck tone to volume, volume to bridge tone.
- The toggle tags are not labelled in the source, so they are mapped by what each does.
Understand this wiring
- Seymour Duncan humbucker wire colors
See the pickup, recognise its two halves, and learn where each coloured wire goes.
- Seymour Duncan coil splitting explained
A humbucker has two coils. See how a switch lets you use just one of them.
- Reading Seymour Duncan push/pull switch diagrams
Turning the knob and pulling it do different jobs. See the actual part, then try its switch connections.
Connections
In soldering order: grounds first, then the switch, the pickups and the signal path. Choose Show to highlight a connection in the drawing.
| # | From | To | How | Drawing |
|---|---|---|---|---|
| 1 | Neck green | Neck tone casing | To a pot casinggreen | |
| 2 | Neck bare shield | Neck tone casingDrawn grey beside the green. | Shield or groundbare | |
| 3 | Toggle frame lug | Neck tone casing | To a pot casingblack | |
| 4 | Neck .047 cap | Neck tone casing | To a pot casing | |
| 5 | Bridge green | Volume casing | To a pot casinggreen | |
| 6 | Bridge bare shield | Volume casingDrawn grey beside the green. | Shield or groundbare | |
| 7 | Bridge .047 cap | Bridge tone casing | To a pot casing | |
| 8 | Push/pull left bottom lug | Volume casing | To a pot casingblack | |
| 9 | Volume right lug | Volume casingLug bent onto the casing. | To a pot casing | |
| 10 | Neck tone casing | Volume casing | To a pot casingblack | |
| 11 | Bridge ground wire | Neck tone casing | Wireblack | |
| 12 | Volume casing | Bridge tone casing | To a pot casingblack | |
| 13 | Bridge tone casing | Jack sleeve | Wireblack | |
| 14 | Neck tone top lug | Toggle neck lug | Wireblack | |
| 15 | Bridge tone top lug | Toggle bridge lug | Wireblack | |
| 16 | Toggle middle lug | Volume left lug (input) | Wireblack | |
| 17 | Neck red | Push/pull right middle lug | Wirered | |
| 18 | Neck white | Push/pull right middle lugShares the lug with the neck red. | Wirewhite | |
| 19 | Neck black | Neck tone top lug | Wireblack | |
| 20 | Bridge red | Push/pull left middle lug | Wirered | |
| 21 | Bridge white | Push/pull left middle lugShares the lug with the bridge red. | Wirewhite | |
| 22 | Bridge black | Bridge tone top lug | Wireblack | |
| 23 | Neck tone middle lug | Neck .047 cap | Wire | |
| 24 | Bridge tone middle lug | Bridge .047 cap | Wire | |
| 25 | Push/pull right bottom lug | Push/pull left bottom lugShort jumper along the bottom row. | Wireblack | |
| 26 | Volume middle lug | Jack tip | Wireblack |
What each position does
| Setting | The source | Engine result |
|---|---|---|
| Neck, knob down: full humbucker | — | Neck Pickup (both coils). |
| Both, knob down: both humbuckers | — | Neck Pickup (both coils) and Bridge Pickup (both coils) in parallel. |
| Bridge, knob down: full humbucker | — | Bridge Pickup (both coils). |
| Neck, knob pulled: single coil | The split switch splits both pickups. | Neck Pickup (split to one coil). |
| Both, knob pulled: both split | The split switch splits both pickups. | Neck Pickup (split to one coil) and Bridge Pickup (split to one coil) in parallel. |
| Bridge, knob pulled: single coil | The split switch splits both pickups. | Bridge Pickup (split to one coil). |
Checked with the Tinkercaster wiring engine against the switching the source describes.
- Hum cancelling and phase describe the generic pickup models, not a measurement of any specific Seymour Duncan model.
- Pickup resistance is not specified, so no numeric meter readings are given.
- The source does not say which knob position splits; this follows the usual push/pull behaviour (pulled joins the middle lugs to the lugs nearest the pot).
- The simulator's position summary names one tone control only; each tone sits on its own pickup's lead ahead of the toggle, so in the middle position both tones act on the combined signal.
Before you solder
Ticks are kept in this browser only, as a reminder. They are not a check of your joints. New to soldering? Read the soldering cheat sheet.
Check before plugging in
- Knob down: in each toggle position the meter across the jack reads the selected humbucker, or both in parallel in the middle.
- Knob up: each reading drops to roughly one coil's resistance.
- With the volume at zero, tip and sleeve should read as a short in every position.
Measure across the output jack with a multimeter on its resistance range. No exact readings are given where the source does not specify the pickups.