 Tinkercaster
Wiring ideas
How to wire a Strat 5-way switch
Every lug on a Strat five-way blade, traced through Tonerider's standard Strat harness: which pickups each position joins, why the bridge has no tone, and what to meter.
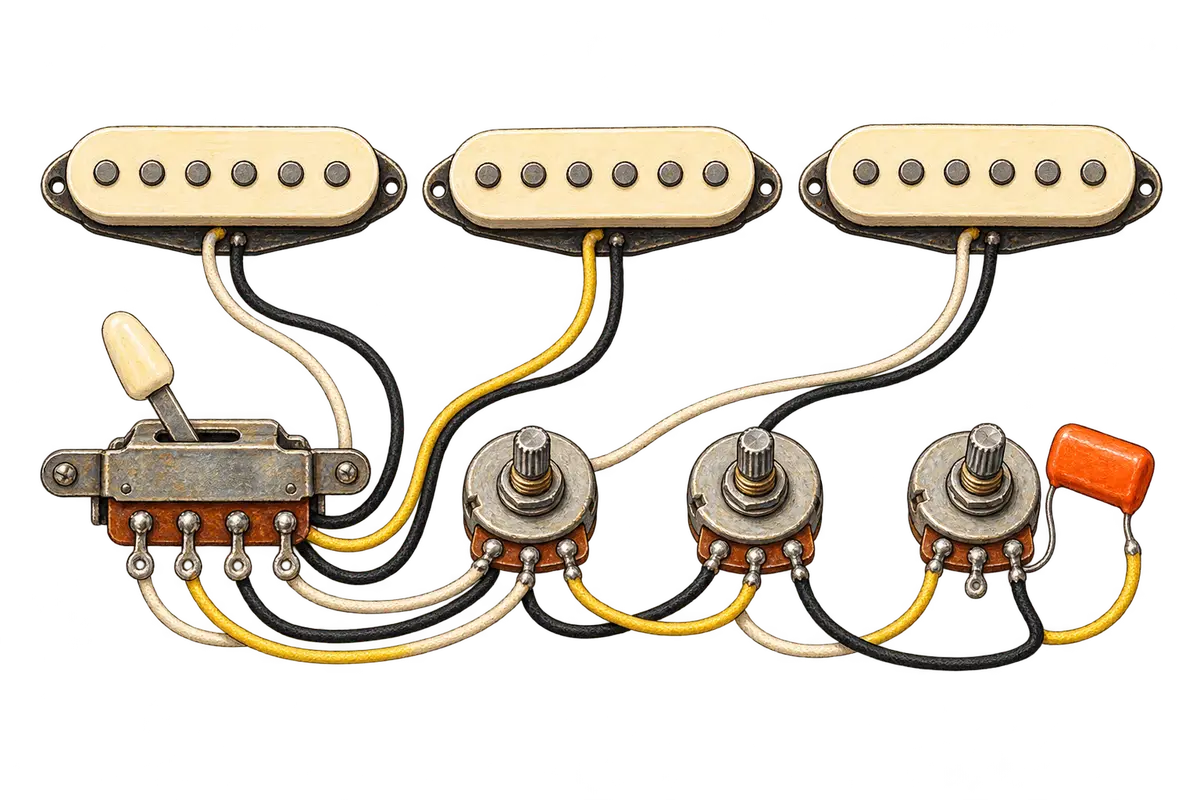
A Stratocaster five-way blade is two identical switches on one lever. The front row picks which pickups reach the volume pot; the back row decides which tone pot is in the circuit. Positions 1, 3 and 5 give the bridge, middle and neck pickups alone. Positions 2 and 4 put two pickups in parallel: bridge with middle, then middle with neck. Premier Guitar’s teardown of the CRL switch describes it the same way: two stages of four lugs, pickups into the first stage, tone pots on the second, and a jumper between the two stages’ common lugs.
This article walks through one harness in full, our drawing of Tonerider’s standard Stratocaster sheet, and then compares it with the other Strat sheets in our library from Tonerider, Seymour Duncan and DiMarzio. All of them wire the switch the same way. The tone controls are where they part company.
The parts in the Tonerider harness
Our drawing of Tonerider sheet WIR-3001 uses these parts. The sheet names values, not models, so the diagram marks each catalog part as a compatible example.
| Part | Value or type on the sheet | Compatible example in our catalog |
|---|---|---|
| Neck pickup | Single coil, white hot, black ground | Tonerider Pure Vintage Neck |
| Middle pickup | Single coil, yellow hot, black ground | Tonerider Pure Vintage Middle |
| Bridge pickup | Single coil, white hot, black ground | Tonerider Pure Vintage Bridge |
| Switch | Five-way blade | Oak Grigsby 5-Way or CRL 5-way |
| Master volume | 250k | CTS 250k Audio Pot |
| Neck tone and middle tone | 250k each | CTS 250k Audio Pot |
| Tone capacitor | .022 µF, one shared by both tones | Orange Drop .022µF |
| Output jack | Mono | Switchcraft #11 |
Why 250k and not 500k? Single coils are bright, and a 250k pot shaves a little treble that a 500k pot lets through. Our article on 250k vs 500k pots covers the trade in detail.
Tonerider standard Stratocaster, drawn by Tinkercaster from sheet WIR-3001.
Parts, connections and bench checks ↗Open interactive diagram ↗Reading the switch lugs
Each row of the blade has four lugs. One of them is the common: it is connected to whichever contacts the lever touches. The other three are the pickup contacts, and they sit in the same columns on both rows, so the lever moves both rows together.
The Tonerider sheet labels them by position. On the front row, counting from the top of the drawing: the bridge lug, the middle lug, the neck lug, then the common. The back row has its common at the opposite end. Our drawing names the same lugs T1 to T8: front row bridge T3, middle T1, neck T2, common T4; back row middle T5, neck T6, bridge T7, common T8. The numbers are only a labelling convention, and the order on a real switch depends on the make. Premier Guitar notes that the Oak Grigsby blade has its lugs “oriented a little differently” from the CRL, though the same wiring transfers lug for lug once you know which is which.
So before you solder, map your switch with the meter. On continuity, put one probe on a row’s common and step the lever through all five positions with the other probe on each lug in turn. The bridge lug beeps in positions 1 and 2, the middle lug in positions 2, 3 and 4, and the neck lug in positions 4 and 5. Mark the commons with a dot of paint or a tag of tape. Premier Guitar’s installation article recommends the same trick: probe one lug, flip the switch and watch what changes.
Every connection, and why it is there
Here is the diagram’s connection list grouped by job. The numbers match the list on the diagram page, which runs in soldering order: grounds first, then the switch, then the signal path.
Grounds
- (1, 2, 3) Neck black, middle black and bridge black to the volume casing.
- (4) The volume’s ground lug bent onto its own casing.
- (6, 7) Neck tone casing to volume casing, middle tone casing to neck tone casing.
- (8) Jack sleeve to the volume casing.
Pickup leads to the front row
- (9) Bridge white to the bridge lug.
- (10) Middle yellow to the middle lug.
- (11) Neck white to the neck lug.
The jumper and the signal path
- (12) Front common to back common. This short jumper is what makes the back row follow the signal.
- (13) Back common to the volume’s input lug.
- (16) Volume middle lug (the wiper) to the jack tip.
Tone controls
- (14) Back row neck lug to the neck tone’s middle lug.
- (15) Back row middle lug to the middle tone’s middle lug.
- (17, 5) The .022 µF capacitor from the neck tone’s outer lug to the neck tone casing.
- (18) A bare jumper from the neck tone’s outer lug to the middle tone’s outer lug, so both tones share the one capacitor.
The back row’s bridge lug stays empty. That is the classic Strat layout, and it is why the bridge pickup has no tone control: in position 1 neither tone pot is connected to anything. The Tonerider sheet draws no ground wire from the bridge or tremolo claw. Most Strats have one, and the Seymour Duncan and DiMarzio sheets below both draw it, so run a wire from the claw to the volume casing as well.
How the switch produces five sounds
Trace the two rows position by position. The front common reaches the pickup lugs; because the back common is jumpered to it, the back row connects the tone pots for the same pickups at the same time.
| Position | Front row reaches | Back row reaches | Tone control |
|---|---|---|---|
| 1. Bridge | Bridge lug | Bridge lug, empty | None |
| 2. Bridge + middle | Bridge and middle lugs | Bridge and middle lugs | Middle tone |
| 3. Middle | Middle lug | Middle lug | Middle tone |
| 4. Middle + neck | Middle and neck lugs | Middle and neck lugs | Both tones |
| 5. Neck | Neck lug | Neck lug | Neck tone |
In positions 2 and 4 the blade touches two adjacent contacts at once, so two pickups sit side by side between the volume input and ground. That is a parallel connection. Our series vs parallel article explains why it sounds thinner and brighter than either pickup alone.
Those two positions can also cancel hum, but only if the middle pickup is reverse wound and reverse polarity (RWRP) relative to the neck and bridge. Seymour Duncan’s Vintage Staggered Strat page describes the set this way: standard neck and bridge pickups and an RWRP middle “for noise cancellation in the in-between positions.” The Tonerider sheet does not say whether its middle is RWRP, so our diagram makes no hum claim. Check your pickup set’s documentation. If positions 2 and 4 sound hollow and thin, one pickup is out of phase: see our guide to single-coil phase reversal.
Check it before plugging in
The sheet gives no pickup resistances, so there are no fixed numbers. Measure each pickup on its own first, across its two leads, and write down the readings: Rn (neck), Rm (middle) and Rb (bridge). Then set the meter to resistance, turn the volume to full, and probe the jack tip and sleeve. The tone path reads open at DC because of the capacitor, so it does not affect these readings.
| Position | Expected reading at the jack | If it reads wrong |
|---|---|---|
| 1. Bridge | Rb | Open: bridge white not on its lug, or the front jumper missing. |
| 2. Bridge + middle | Lower than either: Rb × Rm / (Rb + Rm) | Reads Rb or Rm alone: the other lead is not on the switch. |
| 3. Middle | Rm | Reads another pickup: middle and neck leads swapped on the switch. |
| 4. Middle + neck | Lower than either: Rm × Rn / (Rm + Rn) | Reads Rm or Rn alone: one lead is not on the switch. |
| 5. Neck | Rn | Reads Rb: neck and bridge leads swapped. |
| Any, volume at zero | A short | Volume wiper or casing ground fault. |
The 250k volume track sits across the pickups at DC, so every reading comes out a little lower than the pickup alone. Two more checks from the diagram: in position 1, turning either tone should change nothing, and plugged in at low volume, each tone should darken the positions the table above says it controls. The multimeter course covers the technique, including why a reading can look right when a joint is poor.
Mistakes first-timers make
- Swapping the commons. If the jumper or the volume wire lands on a pickup lug instead of a common, some positions go silent. Map the switch first.
- Bridging two lugs with solder. The lugs are close together. Tin the wire, not the gap, and use a small amount of solder. Our soldering cheat sheet shows a good joint.
- Tone wires on the wrong back-row lug. The neck tone goes to the back row’s neck lug and the middle tone to its middle lug. Swap them and each knob controls the other pickup; put one on the bridge lug and you have built the bridge-tone mod by accident.
- Leaving the bridge ground off. Without a wire to the tremolo claw the strings are not grounded, so touching them no longer quiets the hum. Our buzzing guide works through this and other causes.
How the other Strat sheets compare
Our library has 13 diagrams for three single coils on a standard five-way blade, from Tonerider, Seymour Duncan and DiMarzio. In all 13 the five blade positions select the pickups exactly as in the table above; some add a push/pull or mini-toggles on top. Eight use a .022 µF tone capacitor, three use .047 µF and two have no tone control at all. They differ in which pickups the tone pots reach.
Tonerider Stratocaster with a bridge tone, drawn by Tinkercaster from sheet WIR-3002.
Parts, connections and bench checks ↗Open interactive diagram ↗Tonerider’s second sheet, WIR-3002, keeps the same switch connections but jumpers the back row’s middle and neck lugs together into one tone pot, and wires the back row’s bridge lug to the second tone. Every position now has a tone control, and the bridge pickup can be tamed, which is the usual reason players make this mod. Both tones still share one .022 µF capacitor.
Seymour Duncan three single coils, five-way, one volume and two tones, drawn by Tinkercaster from sheet 3S_5W_1V_2T.
Parts, connections and bench checks ↗Open interactive diagram ↗Our drawing of Seymour Duncan’s sheet 3S_5W_1V_2T feeds its two tones from the back row’s middle and neck lugs, like Tonerider, but uses a .047 µF capacitor, the only value the sheet prints. Its neck and middle pickups use white for hot and black for ground, and it draws the bridge ground wire to the volume casing. Seymour Duncan’s guide to pots and caps describes .047 µF as the darker of the two common values; either fits the same lugs (Orange Drop .047µF).
DiMarzio Strat standard wiring, drawn by Tinkercaster from DiMarzio's Strat Standard Wiring sheet.
Parts, connections and bench checks ↗Open interactive diagram ↗DiMarzio’s Strat Standard sheet prints True Velvet pickups (DP175 neck, DP175S middle, DP176 bridge), 250K custom-taper pots and a .022 µF capacitor. Our drawing shows its two tones on the back row’s neck and bridge lugs instead of neck and middle, so the middle pickup is the one without a tone control. Its bridge ground wire goes to the jack sleeve rather than a pot casing, which is the same ground node by another route.
“Standard Strat wiring” means something different at each maker. Pick one sheet and follow it completely with its own lead colours. Taking the tone wiring from one maker and the pickup colours from another is how a tone pot ends up on the wrong pickup or a position goes quiet.
The library also covers the common variations once the three-single-coil layout makes sense: a humbucker in the bridge (HSS), which our Seymour Duncan coil split article splits four ways, three single coils with a master volume and a master tone, and a push/pull that adds the bridge pickup to positions 3, 4 and 5, which gives middle and bridge, all three, and neck and bridge.
Fitting the switch
Unplug the guitar and take the strings off, or slacken them and lift the pickguard carefully so the pickup leads are not strained. Photograph the old harness before you desolder anything. Work in this order: map the new switch with the meter and mark the commons, solder the grounds, fit the jumper between the commons, then the pickup leads, the tone wires and the signal path. Keep each lead long enough to lift the pickguard without pulling a joint. Our article on how to solder guitar wiring covers joint technique, and the guide to wiring an output jack covers the last two connections.
Build it from the diagram
Open the Tonerider standard Stratocaster diagram and read its connection list against your parts. Or start a board from scratch with the pickups, pots and switch you actually have. Both run the same checks, which flag a wrong lug before you heat the iron. The diagrams, the catalog and the courses are free, and you can open any diagram in the workbench, save it and change it, for example to move a tone pot onto the bridge. With Tinkercaster Pro you can ask Luthier about a connection and follow a guided build with meter checks at every step.
References
From the Tinkercaster library
- Standard Stratocaster wiring (Tonerider WIR-3001): parts, connection list, positions and bench checks walked through above.
- Stratocaster wiring with a bridge tone (Tonerider WIR-3002): neck and middle on one tone, bridge on the other.
- Three singles, five-way, volume and two tones (Seymour Duncan 3S_5W_1V_2T): same tone layout, .047 µF capacitor.
- Strat standard three singles five-way (DiMarzio): tones on neck and bridge.
- Catalog: Oak Grigsby 5-Way, CRL 5-way blade switch, CTS 250k Audio Pot, Orange Drop .022µF, Orange Drop .047µF, Switchcraft #11.
- Guides and courses: single-coil phase reversal, multimeter course, soldering cheat sheet.
Manufacturer and technical sources
- Tonerider: Standard Stratocaster wiring, WIR-3001 (PDF) and Tonerider: wiring diagrams: the harness walked through above and its bridge-tone variant, WIR-3002.
- Premier Guitar: The Anatomy of the Stratocaster 5-way Switch, Part III: two stages of four lugs, pickups on the first, tone pots on the second, the jumper between the commons, and the Oak Grigsby orientation difference.
- Premier Guitar: The Anatomy of the Stratocaster 5-way Switch, Part II: identifying lugs with a meter before soldering.
- Seymour Duncan: Vintage Staggered Strat middle, RWRP: reverse-wound, reverse-polarity middle for noise cancellation in positions 2 and 4.
- Seymour Duncan: best guitar pots and caps: .022 µF and .047 µF compared.
- DiMarzio: Strat Standard Wiring (PDF): True Velvet pickups, 250K custom-taper pots, .022 µF capacitor, tones on neck and bridge.